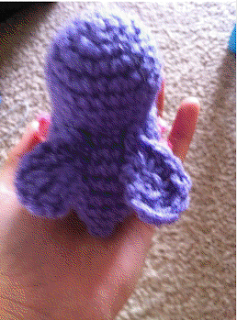
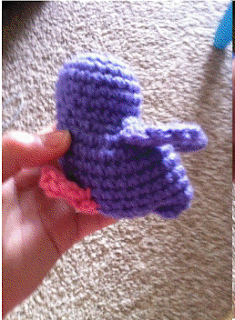
Today we've got another guest post for you! Even though Easter is over, there is still so much spring to be had! And this little chick will brighten up any room:) As always, feel free to send pictures if you crochet this!
Cute Little Chick
an amigurumi design by Nerdybirdycrochet
Supplies:
~G hook
~Worsted weight yarn in any two colors (I used Red heart super
saver. Rough on the hands but they
have a nice selection of plain colors...)
~Small scrap of black yarn or embroidery floss
~oh, and some stuffing, but you probably had that figured out
already:)
Abbreviations:
~sc..........single crochet
~inc........two single crochets in the same stitch
~st..........stitch/stitches
~ch.........chain
~dec.......either a sc2tog, or an invisible decrease, whichever
you prefer.
~dc.........double crochet
Notes:
~This is worked in the round as a spiral.
~It uses the magic circle technique.
~ Stitch count only matters
up to the eighth round. From round 9 and on it doesn't really matter:)
Pattern:
Head/body (make one):
R1: In magic circle, do six sc.
R2: Now, close that magic circle! Now, without turning, inc
around. Yay, you've got 12 st around.
R3: Now, you've got to remember this sequence: *Inc in next st,
sc the next st after that.* Go around
the whole round with that sequence and you should end up with 18
st.
R4:*Inc in next st, sc in each of next two st after that*
around. You should end with 24 st! :)
R5-7: Just straight sc'ing. No fancy sequences to remember! Just
keep crocheting.
Uh-oh...I see your circle slowly flipping itself inside
out...quick! Change it to the right side out! Oh,
confused, are you? ...Never fear, here's a really, really handy
linky:
R8: Some decreasing coming right up...*1 dec, sc in each of next
two st after that* All the way around.
You should now have 18 st!
R9: sc in the next eleven stitches, then inc in each of the rest
of the st. You should have 25 st around.
R10: sc in the next 12 st, and and inc in the rest. You *should*
have 38 st here. If not it doesn't matter:)
Woah- before we move on, take some stuffing and stuff your
little piece to death.
R11-13:sc around!
R14: 6 dec, then sc the rest of the way around.
R15: sc around
R16: sc first st, 4 dec, then sc the rest of the way around.
R17: sc about 12 or 13 st to where the little tail will be. Pinch
off approx. 6 st and sc them together, like this:
See what I did there? I stuck my hook into TWO stitches! Now what
I did was sc each of the next few st, except stick your hook into two layers,
as shown, until you get to the end.
Then turn and slip stitch back across what you just did. (approx.
3 slip stitches. No ch 1 needed.)
Now continue going around like you just took a detour and
R18: Just dec until you have a small hole about 5 to 7 st around,
cut your yarn, and close the hole with the tail you left.
Good job!!!!! You've just completed the head/body!
Now we move onto the wings....
Wings (make two):
Using main color.
In Magic Loop, do one sc, 2 dc, and one more sc. Close Magic Loop.
R2: ch 2, and turn. Dc into first st, then two dc in all the rest.
Cut yarn leaving a tail long enough for sewing.
Yay, that was easy! One more thing- the feet.
Feet(make two):
With contrasting color, ch 6
R1: sk first two ch from hook, sc next ch and all the rest of the
ch in this row.
R2: ch1, turn. Sc next 3 st, ch3, and turn.
R3: sk first two ch from hook, sc the third ch and the rest of the
row.
R4-5: repeat rows 2+3.
break off, leaving tail long enough for sewing.
Assembly
Sewing the parts:
Refer to photos for wing and feet placement. Weave in unnecessary
ends when finished.
Ok.. hopefully you figured out that the little pointy tip you made
by sc two layers of crochet together, is the tail. The smaller rounded end is
the head.
So do you see how it's supposed to be, now? Good! :D soon comes the facial embroidery.
Embroidering the facial features:
With a scrap of black yarn embroider a simple V-shape for the
eyes.
Cut a small diamond with felt and sew it on the bird.
Done!
I really hope you enjoyed making this! I know I did!
Please comment on ravelry if my instructions were unclear.
All photos and pattern copyright (c) Nerdybirdycrochet. You may
sell items made from this pattern if you wish, but not the pattern itself.
Thank you.


