Showing posts with label sewing. Show all posts

Monday, February 17, 2014

DIY Coffee Cozy w/Sunshine Shoppe Supply

 
I'm back today with another fun tutorial for you: a super easy, no-sew coffee cozy with a cute flower:)  If you didn't see my Shabby Heart Sweatshirt, go check it out!  But make sure to come back!;)
 
Once again, the flower in this project is from the Sunshine Shoppe Supply.
 
You will need
  • Felt
  • Fabric scissors
  • Coffee cozy template (I used the pattern from this site)
  • Pins
  • Sewing machine
  • Hot glue gun
 
Cut your coffee cozy out of felt.

 Pin the short ends together.
 
 Sew with 1/4" seam allowance
 
 Iron down the middle of the seam so that it is not sticking up off of the coffee cozy and turn inside out.
 
 
Put glue on the back of your flower in a spiral and press it on to the coffee cozy.  You can either put it on the seam to hide it, or directly across from it.
And voila, you have a super easy coffee cozy with a pop of color that you need until spring comes along!:)

Now take your coffee and go cozy up with a good book...out in the woods if you'd like!  Oh, and you might wanna make the sweatshirt so that you don't get too cold;)

Don't worry, the weather's not always perfect here.  It was actually like 20 degrees when we were taking these pictures.....and we had 9 inches of snow 3 days later:)
 
~Kelsey
 
I was featured on:

I was featured at Creativity Unleashed!
 Linking up to:

Saturday, February 8, 2014

Heart Sweater w/Sunshine Shoppe Supply and Giveaway! (closed)

Hello there!  Today I have an awesome (somewhat last-minute) Valentine's Day project for you!  But you know, this can go so far past Valentine's Day!  I'm pretty sure I'm going to be wearing this sweatshirt all spring, and maybe some cool evenings in the summer!!!
 
I've worked together with Sunshine Shoppe Supply to create a few items using their supplies.  I'm excited to show you what I've come up with!  But without further ado, let's get started!!!
 
Supplies:
  • Shabby Flowers (I used 16, but this will just depend on the shape and size of your heart
  • Crewneck sweatshirt (I found this one at Target for under $5)
  • Basic sewing supplies
The shabby flowers come on mesh like this.  To begin with, cut each strip so that all of the flowers are separate and then trim the mesh off from around the flower, being careful to not cut the stitches that hold the flower onto the mesh!
 
Next, lay out the flowers how you like them on the sweatshirt.  Start with the two center flowers to make sure that they are perfectly centered and go on from there.  I rearranged a few times until I had the perfect color combo and heart shape that I wanted.
 
Pin each of the flowers in place (careful that you do not mess up the others while you are pinning one down).
 
You are going to sew a circle on top of each flower.  Each flower is constructed somewhat like a spiral.  Start sewing at the "entrance" of the spiral and continue in a circle until have gone a full circle and are at the beginning again.  Don't forget to backstitch at both the beginning and the end!
 
Keep sewing until you have all of them tacked on........and you are finished!  Super easy right?!:)
 

The shabby flowers were super easy to work with, and I love all of the different colors!  They may fray a little bit, but don't worry about that.  There is one flower that has frayed more than the rest, and everyone who compliments me on the sweatshirt says that one is their favorite!;)
 
Are you ready for the giveaway???!!!  Every blogger always says that she wishes she could enter her own giveaways, and I really do ha!
Sunshine Shoppe Supply is so generously offering a $35 gift card to one of my readers!  So go check out their website and come back here to enter to win!


The flowers for this project were provided by the Sunshine Shoppe Supply.  They did not pay me to do this post but did provide the flowers.  All opinions and statements are my own.


Linking up with:


Monday, August 26, 2013

The Sweet Scallops Tote

Hello!  Here I am for one last (semi-large) project for the summer.  I don't know about you, but nothing inspires me to create like summer coming to an end does.  I quickly realize how little time I have left to finish up my projects, so I get right to work!  Some of you may have seen the sneak-peek of this tote on Instagram (fancythatnotion).  Unfortunately, it was a sad one.  The kind where your thread runs out one inch away from being done with a 12-hour project.  At 10:30 at night.  But you know what?  It was "totes" worth it.  *couldn't help myself*  This is another bag pattern from See Kate Sew that has been sitting on my Pinterest board for a while.  I raided my fabric stash once more and came up with this combination.
 
 
The pattern and instructions were written so well and all of the sewing was very simple.  This would be the perfect project for a beginner!  Those scallops take a while to cut and sew, but the finished product is worth the time.
 
Kate pays so much attention to detail (You should check out her ruffles series going on right now!).  The top-stitching gives the body of the bag a clean, finished look.


The possibilities of combinations are endless!  You can base off of one color-theme, do an ombre look, or whatever you fancy!!!  The two blue fabrics were vintage sheets and pillow cases.  Pink polka dots and the purple flowers were my gramma's fabrics, and the top two were purses!  This is such a great fabric-stash buster!!!
 
The inside of the bag is my favorite vintage sheet.........again.  I used it for my envelope clutch here as well.


I hope you are enjoying the last few days of summer!  If you are looking to learn to sew, Kate has a bunch of great tutorials, and this project would be a perfect one to start off on!!!  Have a lovely Monday, friends!!!
~Kelsey


Tuesday, August 13, 2013

Envelope Clutch


Hi.  My name's Kelsey and I start my Christmas shopping sewing in July.  Ok, maybe I do some shopping too.  Now don't start thinking that I'm on top of my game in any way.  I mean, after all, I haven't touched this blog in almost two months.  And I saw the pattern for this clutch in February.  Yep, FEBRUARY.  I've had all the supplies, plenty of time, the pattern on hand.  And yet........it's August.  But hey, at least I sewed something that has been hanging out on my Pinterest board right?
 
Anyways, Kate over at See Kate Sew created this pattern in February and had a mini series of other ladies sewing up their own versions.  So, here is what I came up with for this awesome pattern!  For the outside, I used a sophisticated and simple tan canvas.  I plan on adding a decorative pin on a chain for the closure (I'm afraid of button holes).

On the inside, I added a pop of color with a vintage sheet that I scored for just a few quarters (remember this shopping trip?).  This pouch is going to be a Christmas gift for my sister (Shhh! If you see her, don't tell!).
 
 I love how you can barely see the edge of the sheet from the outside!


I also whipped up this clutch using a sturdy black denim and then a thin gingham (sp?).  Even with the extreme weight difference, it was still easy to sew up.  And when I said whipped up, I really meant it.  I had been working on a super fun shirt that totally ended up being the wrong size (maybe I'll post that later.....#DIYfail).  I instantly needed a project that I new worked, so I whipped up that clutch in under an hour!  I think these might be my new "standard" gift.  Super simple to sew, with endless pattern options!  You can sew on a fun button, use a snap or magnet for a hidden option, or use a decorative pin to keep it closed!
 
Also, I wanted to point out the graphics that I used for these pictures.  The lower one was created with the "A Beautiful Mess" app (hashtags are #abmapp and #abeautifulmess) and the "Rhonna Farrer' app (#rhonnadesigns_app and #rhonnadesigns).  The lower one used the "A Beautiful Mess" app.  If you don't have either of these, you should grab them up!


Kitchen Table Art

Monday, March 18, 2013

A Few of my Favorite Things: Baby shoes

Who doesn't love baby toes?  I mean, seriously, they are like the cutest thing ever!  But sometimes, necessity requires them to be covered up.  So how about some cute shoe inspiration???:)

I love the fabric mix that Megan @ Homemade Ginger used on these adorable shoes.  She used a pattern from Homespun Threads.
 
 Ok, so technically the creator behind Grosgrain Fabulous didn't make the shoes, but she did create the adorable flower clips!
baby shoes tutorial
Jess @ If Only They Would Nap made these little shoesies out of felted wool.  They look so comfy!

Kimono-inspired shoes: so original!  I never would've thought of this combination, Aimee @ Home Spun Threads sure pulled it off nicely!

The Mila shoes.   Oh the ruffles.  And the stripes!  (Is it just me, or does it look like those ruffles were once a button-up dress shirt?) Laura @ The Fleeting Thing has got it right when it comes to baby shoes;)
 Do you follow Shwin&Shwin?  If you don't, this post can wait.  Head over and follow!

Alright, now that you're back from drooling over her creations, check out these adorable shoes!  One of the many things that she can do well is mix patterns.  I love the boldness of the main fabric against the blank slate of denim.

Ashley @ Make It and Love It said it right: these shoes are irresistible.  Orange and blue (one of my favorite color combinations), ruffles, ahhhhhhhhh.


Saturday, December 15, 2012

Pacifier Clips


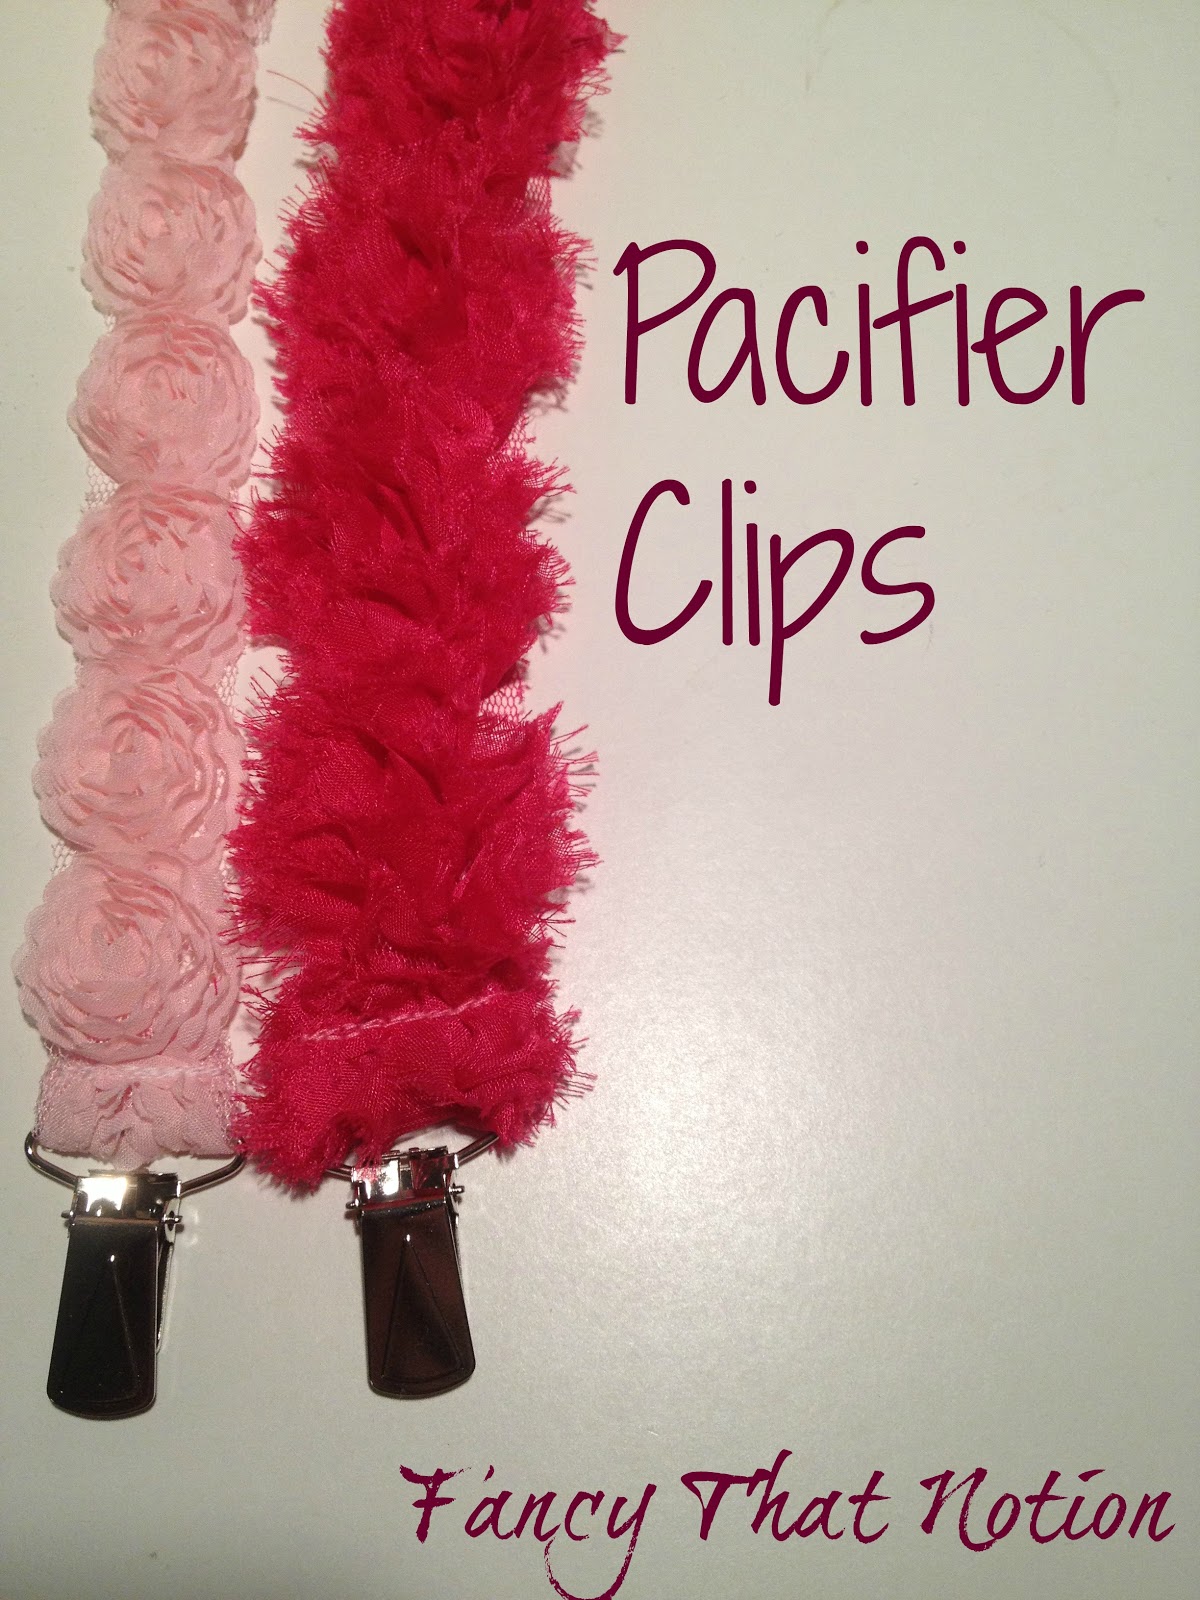
One of my family's very dear friends just had her second baby, an ADORABLE little girl:)  A few weeks ago, I had purchased a few trims to use for pacifier clips.  Unfortunately, one of them got left behind:'(  But here are the other two!
Supplies:
  • Pretty trims that would be perfect for the baby;)
  • Velcro
  • Suspender clips
Cut 4 pieces velcro that are slightly smaller than the width of the trims
Sew one piece onto the very end.  (I sew a square, and then do an "X" through the middle.)
Sew the second piece about 1/4" away from the first.

Loop the other end through the suspender clip and sew back and forth a few times. 

And there you have your adorable pacifier clips!  These are so simple, and certainly beat the store-bought ones!  Now, to find a cute  way to do it for boys:)
~Kelsey
Linking up to:

A Crafty Soiree
 

NightOwlCrafting

Sunday, October 7, 2012

School Pride Flannel Quilt


Webby-world, I [Lara] am here to feature a very, very special guest!! Is it legal to feature your Mommy on your blog? Cause we're doing it!

Both Kelsey and I got our love for everything creative from her... when I was little, she made me a pretty much life-sized doll that had blonde yarn hair and big blue eyes out of fabric paint. I remember sitting for hours and longingly watching her as she hand painted the tiny details on porcelain Pilgrim and Indian Thanksgiving bears. She's made us curtains and bathrobes and dresses and scrunchies and Christmas decorations, and the list goes on and on...

Her latest project was a quilt for a good friend who has graduated from UP and is finishing up his Master's Degree at UW. The comfort of flannel meets school pride in this vibrant purple and yellow quilt!


9" squares of flannel are sewn together, with the ragged ends ending up on one side of the quilt, and the other side ending up flat and clean-looking. You snip along the ragged ends with a pair of fabric scissors. Once you've washed this blanket a couple of times, it takes on a look like chenille where you have cut.


Tuesday, September 25, 2012

Baby "Toms"

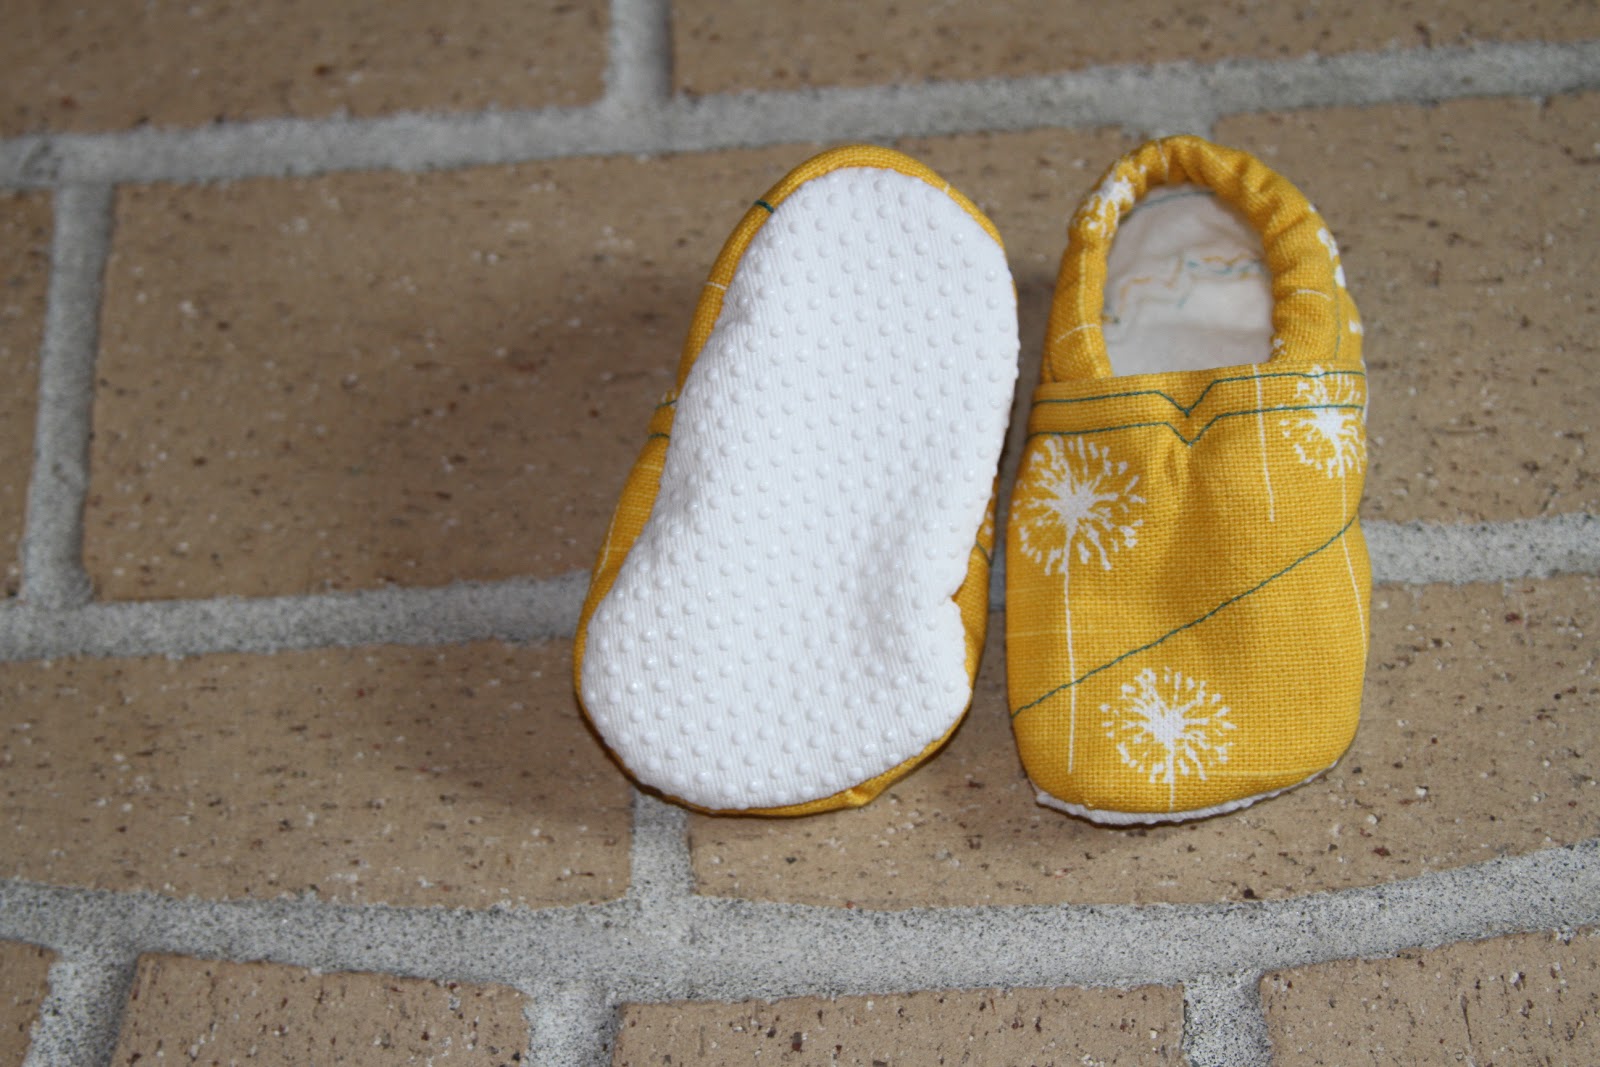
Here are more of those adorable shoes that Lara's whipping up!  (They only take like an hour:)  She used the same pattern as the last pair.  This time, she decided to add some extra stitching to make them look like the ever-popular "Toms"!  For me, it was definitely love at first sight!  I can't wait for someone we know to have a girl, so I can see these awesome shoes in action!:)
She used a dandelion canvas from an apron, plus some grippy material for those early-walkers:)


Linking up to:

Truly Lovely